

Shared Server
Everything in the previous sections runs on your laptop. That's the fastest way to get started, but when you want your Omnigent accessible from your phone, shareable with teammates, or running while your laptop sleeps, you need to deploy.
This section covers Omnigent's architecture, the options for hosting the server, and the options for hosting the runner.
Omnigent has three components: the server, the runner, and the UI.
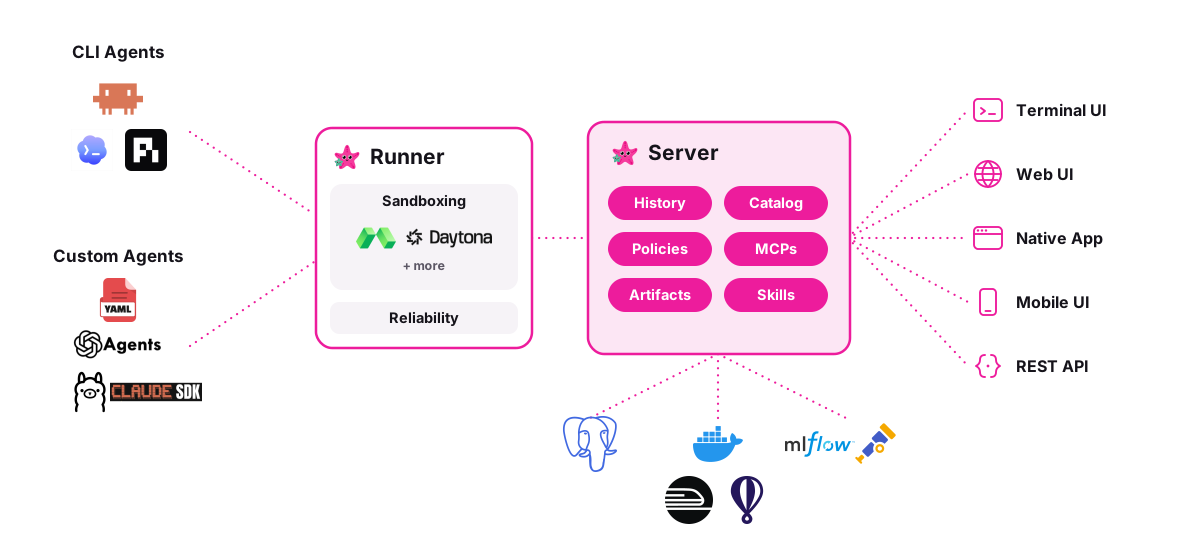
Server
The server is the central coordinator. It manages:
- Session history. Every conversation, message, and tool call is persisted in a database (Postgres or SQLite).
- Artifacts. Files, Omnigent bundles, and uploads.
- Catalog. Registered and built-in Omnigent specs.
- MCP proxy & policies. Proxies MCP tool calls with server-side policy enforcement.
- Skills. Skill definitions that Omnigent can load.
- Auth & accounts. User authentication (built-in accounts or OIDC/SSO).
There are a few options for hosting the server on the cloud:
Docker Compose
Deploy the Omnigent server with Docker Compose. The stack includes the server and a Postgres database.
cd deploy/docker
./bootstrap.sh          # generates DB password + cookie secret into .env
docker compose up -d    # Omnigent server + Postgres
Key variables in .env (See Auth & SSO for details on multi-user auth):
| Variable | Purpose |
|---|---|
DATABASE_URL | Postgres connection string |
OMNIGENT_AUTH_ENABLED | Enable multi-user auth (default: 1 in Docker) |
OMNIGENT_OIDC_COOKIE_SECRET | Session cookie secret |
OMNIGENT_OIDC_ISSUER | OIDC issuer URL (enables SSO) |
OMNIGENT_OIDC_CLIENT_ID | OIDC client ID |
OMNIGENT_OIDC_CLIENT_SECRET | OIDC client secret |
No admin password is auto-generated. On first boot the server reports
needs_setup: open the web UI and create the admin account there, or set
OMNIGENT_ACCOUNTS_INIT_ADMIN_PASSWORD in .env to preset it for headless deploys.
Cloud platforms
Deploy the server to a cloud platform with managed infrastructure.
| Platform | Database | Deploy method |
|---|---|---|
| Railway | Managed Postgres | Import repo from GitHub |
| Render | Managed Postgres | One-click deploy |
| Fly.io | SQLite on volume | fly deploy from CLI |
| Hugging Face Spaces | SQLite (ephemeral) | Docker Space |
Railway & Render. On Railway, import the repo and it handles the
rest, including managed Postgres; Render provisions the app and managed Postgres over
HTTPS via one-click deploy.
Both default to built-in accounts auth, so multi-user works out of the box.
Fly.io. Deploy with fly deploy using SQLite on a persistent
volume. Configuration files are in deploy/fly/ in the repo.
cd deploy/fly
fly deploy
The server idles around ~275 MB RSS. Fly's default 256 MB machine will OOM-loop. The
fly.toml in the repo pins a 1 GB machine. If you changed it, run fly scale memory 1024.
Hugging Face Spaces. Demo-grade Docker Space with SQLite. See
deploy/hf-spaces/ in the repo.
Warning: On Hugging Face Spaces, disk is ephemeral by default and persistent storage is a paid add-on. Data resets on every restart. Use this for demos only.
Databricks
On a Databricks workspace there are two paths, and most users want the managed one.
Managed (recommended). Omnigent on Databricks (Beta) is a fully managed service: Databricks operates the Omnigent server for you, already wired to workspace identity, Foundation Models, AI Gateway, and MLflow Tracing. There is no deploy tooling, Lakebase bootstrap, or bundle to maintain. Enable the Omnigent preview in your workspace settings and follow the quickstart there.
Self-managed. Deploy and operate the Omnigent server yourself on
Databricks Apps via Databricks Asset Bundles,
backed by Lakebase (Postgres) and Unity Catalog Volumes. Configuration is in
deploy/databricks/ in the repo. Reach for this only when the managed
service is not available in your region, or when you need something it does
not expose yet — custom YAML policies, bring-your-own provider API keys, or
custom egress controls.
Kubernetes
Deploy the Omnigent server to a Kubernetes cluster with the kustomize manifests
in deploy/kubernetes/ in the repo. The overlays/sandbox-runners/ overlay
additionally turns on the kubernetes managed sandbox provider
(sandbox.provider: kubernetes): a host_type: managed session spawns a
dedicated runner Pod that runs omnigent host and dials back to the server.
That provider imports a Kubernetes client the base server image omits, so the
overlay pulls the official ghcr.io/omnigent-ai/omnigent-server-kubernetes
image variant — the standard server image plus the kubernetes client extra
(OMNIGENT_EXTRAS=kubernetes). No self-built image is required; the overlay's
images: block already points at it.
kubectl apply -k deploy/kubernetes/overlays/sandbox-runners
# then create the omnigent-creds harness Secret (see the overlay README)
See deploy/kubernetes/README.md and
deploy/kubernetes/overlays/sandbox-runners/README.md in the repo for the full
guide.
Runner
The runner is the per-session process that executes Omnigent loops. It manages the harness (Claude Code, Codex, Claude SDK, etc.), runs tools, and streams events back to the server over WebSocket. The server starts runners on a host: a machine you register with the server.
By default, the host is your laptop. Register it with:
omni login <server-url>  // if auth is enabled
omni host <server-url>
This is why your local Claude Code or Codex installation "just works." Runners started on your laptop have direct access to your machine's tools, files, and credentials.
However, moving the runner to a cloud sandbox host gives you:
- No laptop dependency. Your Omnigent runs even when your machine is off.
- Cloud-native tooling. Your Omnigent can access cloud resources directly.
- Isolation. Each Omnigent runs in its own container, separate from your local environment.
- Scalability. Run many Omnigents in parallel without taxing your machine.
We currently support the Modal and Daytona platforms, with more integrations on the way. Check out the Cloud Sandbox Host page for more detailed setup instructions.
UI
The web UI, terminal UI, and mobile UI all talk to the server. They never talk to the runner directly. This means:
- If the server is on your laptop, UI access is local only
- If the server is deployed to the cloud, any device can reach it, including your phone. Notably, cloud-hosted servers also allow you to collaborate with other users on the same server.
Collaboration
Once the server is cloud-hosted, Omnigent is multi-user: share a live session with a link, let a teammate co-drive your Omnigent, or fork a conversation so someone can continue independently. This has moved to its own page — see Pair Programming for co-drive, sharing with Read/Edit permissions, and forking.