
Web UI
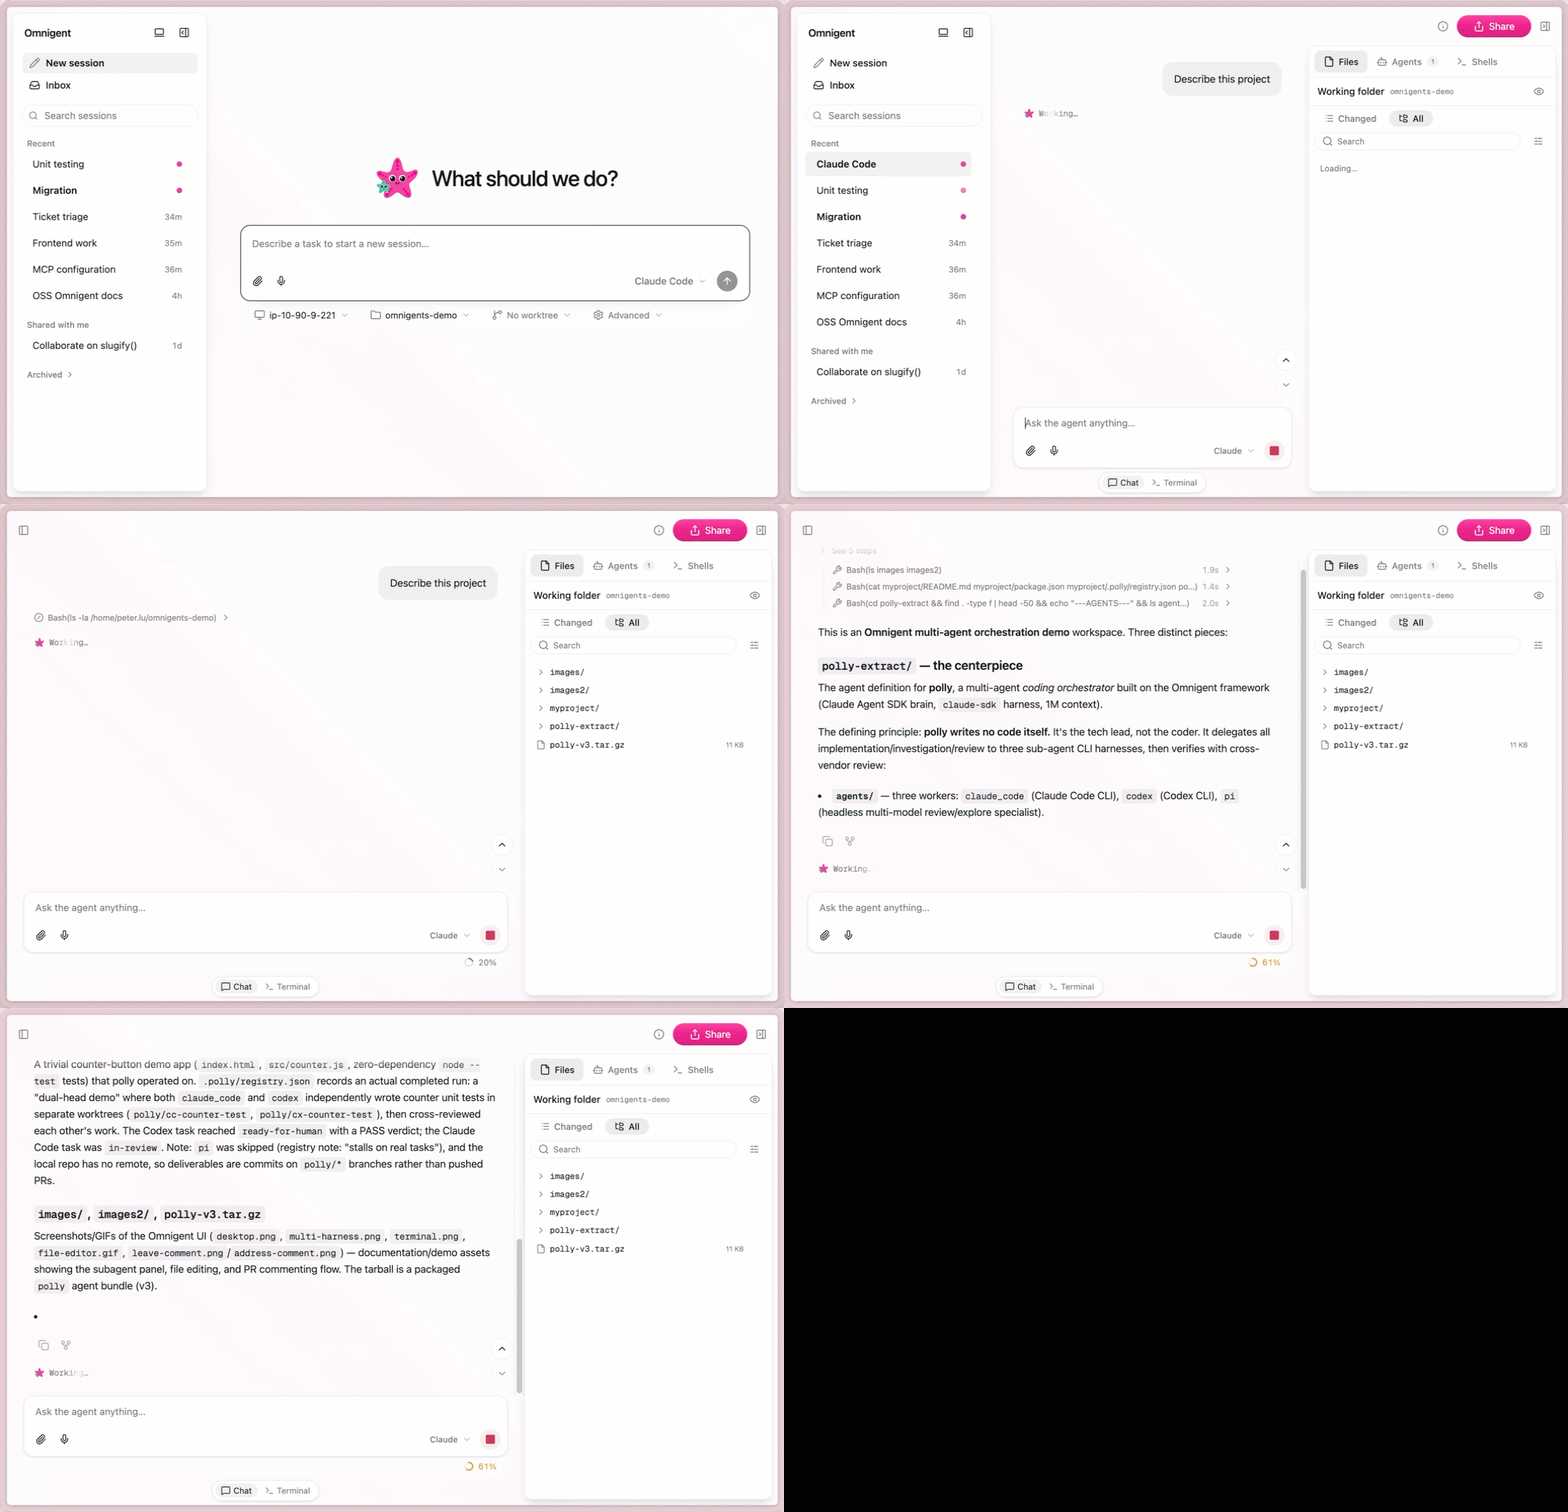
The web UI starts automatically with every session. When the server launches, the URL is printed in your terminal. Open it in any browser to get started.
Session management
See all your sessions in one place. Resume any previous conversation, start new ones, switch between them. Switch agents mid-conversation directly from the UI.
Sessions persist across browser refreshes and server restarts.
Command palette
Press ⌘K (Ctrl+K on Windows and Linux) from anywhere in the UI to open the
command palette. It's a single search box (Search sessions or run a command) with
two groups:
- Actions — quick app commands:
New chat,Go to Inbox,Go to Settings,Toggle conversations sidebar, andToggle workspace sidebar. These filter as you type. - Sessions — jump to any session. The palette searches the server (the same source as the sidebar search), so it finds sessions beyond the ones currently loaded in the list; each result shows the session title and its agent type. Selecting one navigates straight to it.
The hotkey works from any route, even while the composer is focused. When focus
is inside a terminal or the code editor — which claim ⌘K themselves — the
keystroke passes through to them instead. The palette is not available in
embedded mode, where ⌘K belongs to the host page.
You can also find this shortcut in the keyboard-shortcuts reference (⌘/).
Projects
Organize related sessions into a named Project. Each project is a collapsible
folder in the sidebar, keeping a long session list grouped around the work you're
doing. Projects don't nest, and a session belongs to at most one.
You can set or change a session's project from two places:
- When you start a session: in the new-chat composer, use the
Projectchip to search your projects, or type a name to create one on the spot. - For an existing session: open the session's
⋯menu and chooseMove session, then search your projects, create a new one, or remove the session from its project.
Each project folder has a shortcut to start a new session already filed there.
Removing a session from a project moves the session back to Chats section, and deleting a project archives all its sessions.
Worktree branches
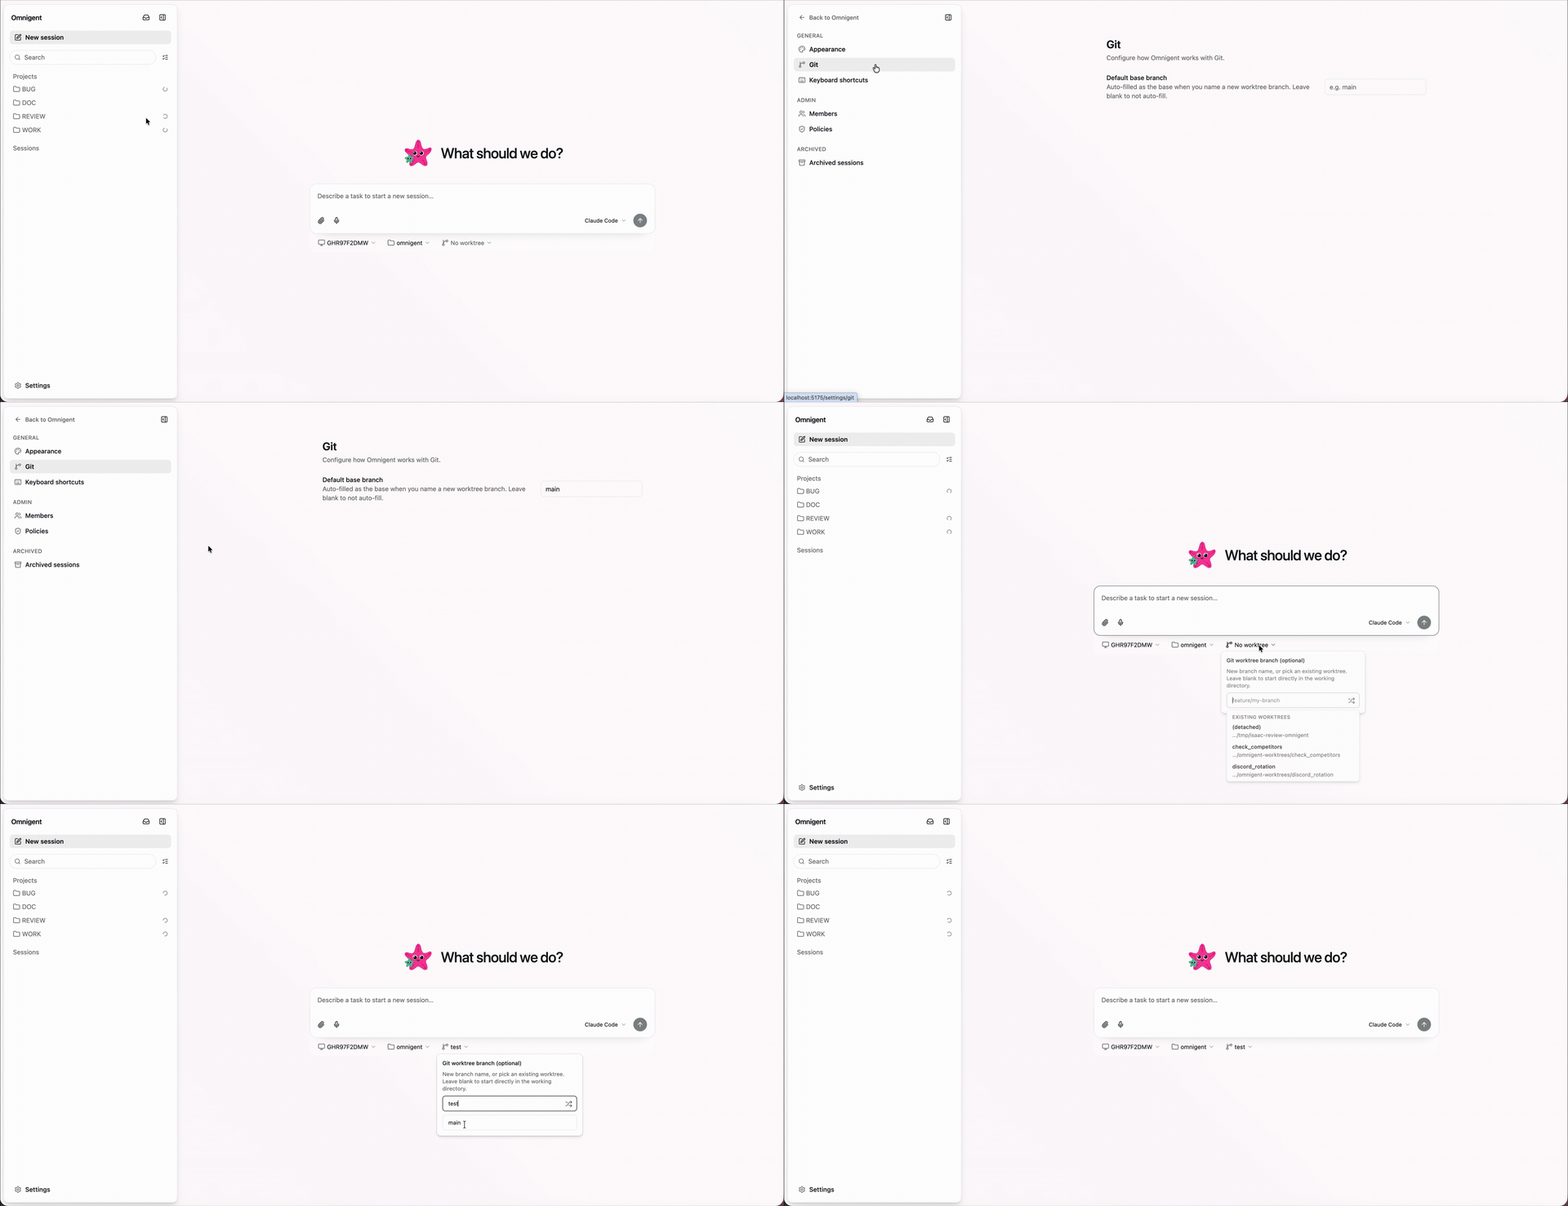
In the new-chat composer, name a branch to run the agent in its own git worktree. Naming a branch reveals a base branch field, the branch the worktree is cut from. Leave it blank to branch off the workspace's current branch.
To avoid retyping the same base, set a Default base branch under Settings › Git. The composer then auto-fills that value whenever you name a new worktree branch; leave the setting blank to turn auto-fill off.
Shared sessions
On a multi-user server the sidebar splits your session list across two tabs:
- My sessions — the sessions you own. This tab keeps the full sidebar
structure: the
Pinnedsection,Projectfolders, and theSessionslist. - Shared with me — a flat list of sessions other people have shared with you.
Browser-first mode
If you prefer to work in the browser rather than the terminal UI, start the server and host daemon once from the command line:
omni server start   # start the local server + web UI in the background
omni host           # (separate terminal) register this machine as a host
After that, open http://localhost:6767 and drive the agent entirely from the browser; no further terminal interaction needed.
Install as an app
The web UI is an installable Progressive Web App (PWA). From a supported browser you can install Omnigent to your desktop or phone home screen and launch it in its own standalone window—no separate download or app store required. Look for your browser's install control (for example, the install icon in Chrome's address bar, or Add to Home Screen on mobile).
Installing is optional: the web UI works exactly the same in a normal browser tab. Because Omnigent is a cloud app with no offline mode, the installed app still requires a connection to your server—it does not cache pages for offline use.
File editor
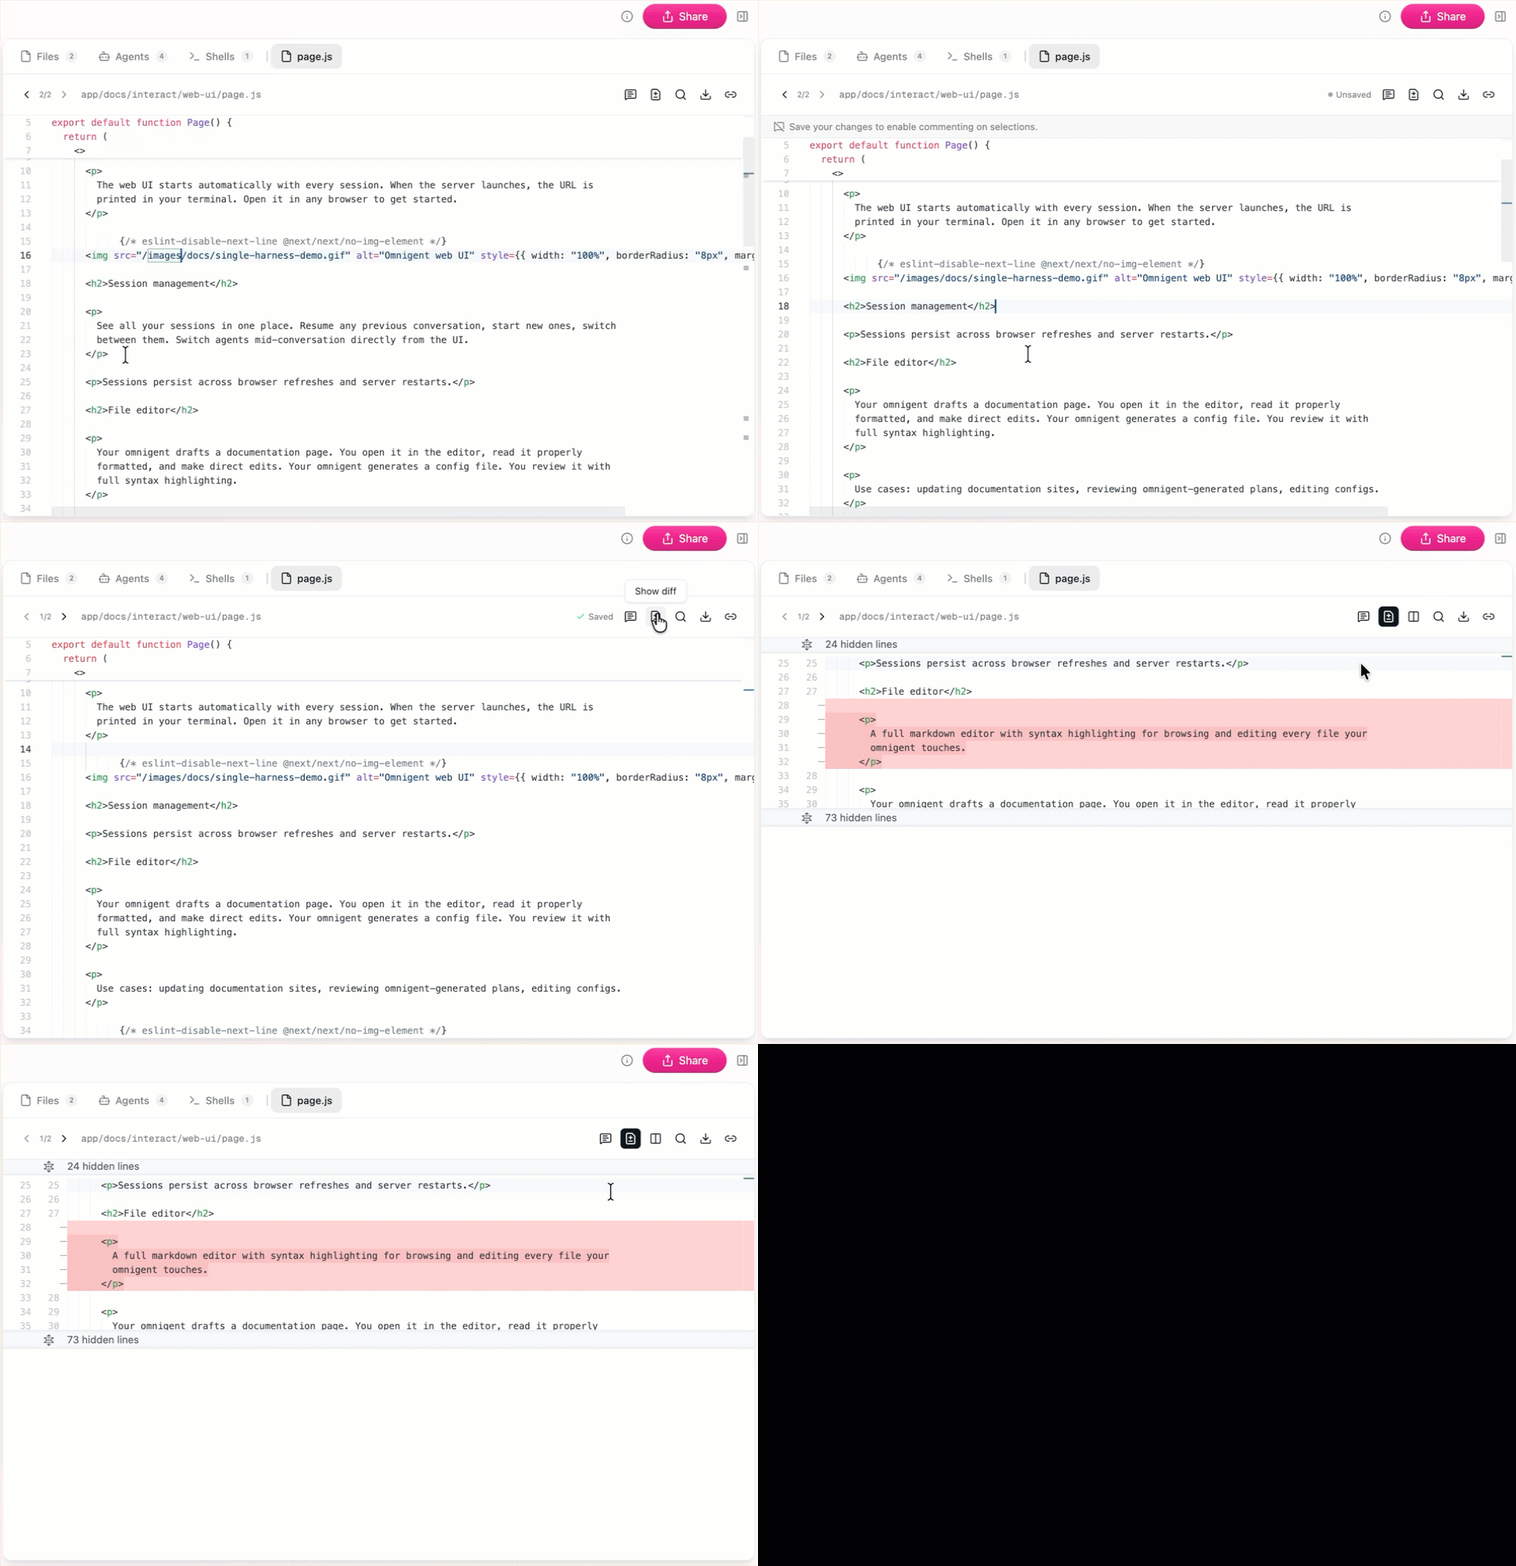
A full markdown editor with syntax highlighting for browsing and editing every file your Omnigent touches.
Your Omnigent drafts a documentation page. You open it in the editor, read it properly formatted, and make direct edits. Your Omnigent generates a config file. You review it with full syntax highlighting.
Use cases: updating documentation sites, reviewing Omnigent-generated plans, editing configs.
Code viewer and diffs
Review what your Omnigent changed before accepting. Syntax-highlighted diffs show exactly what was added, modified, or removed.
Attach a selection to the agent
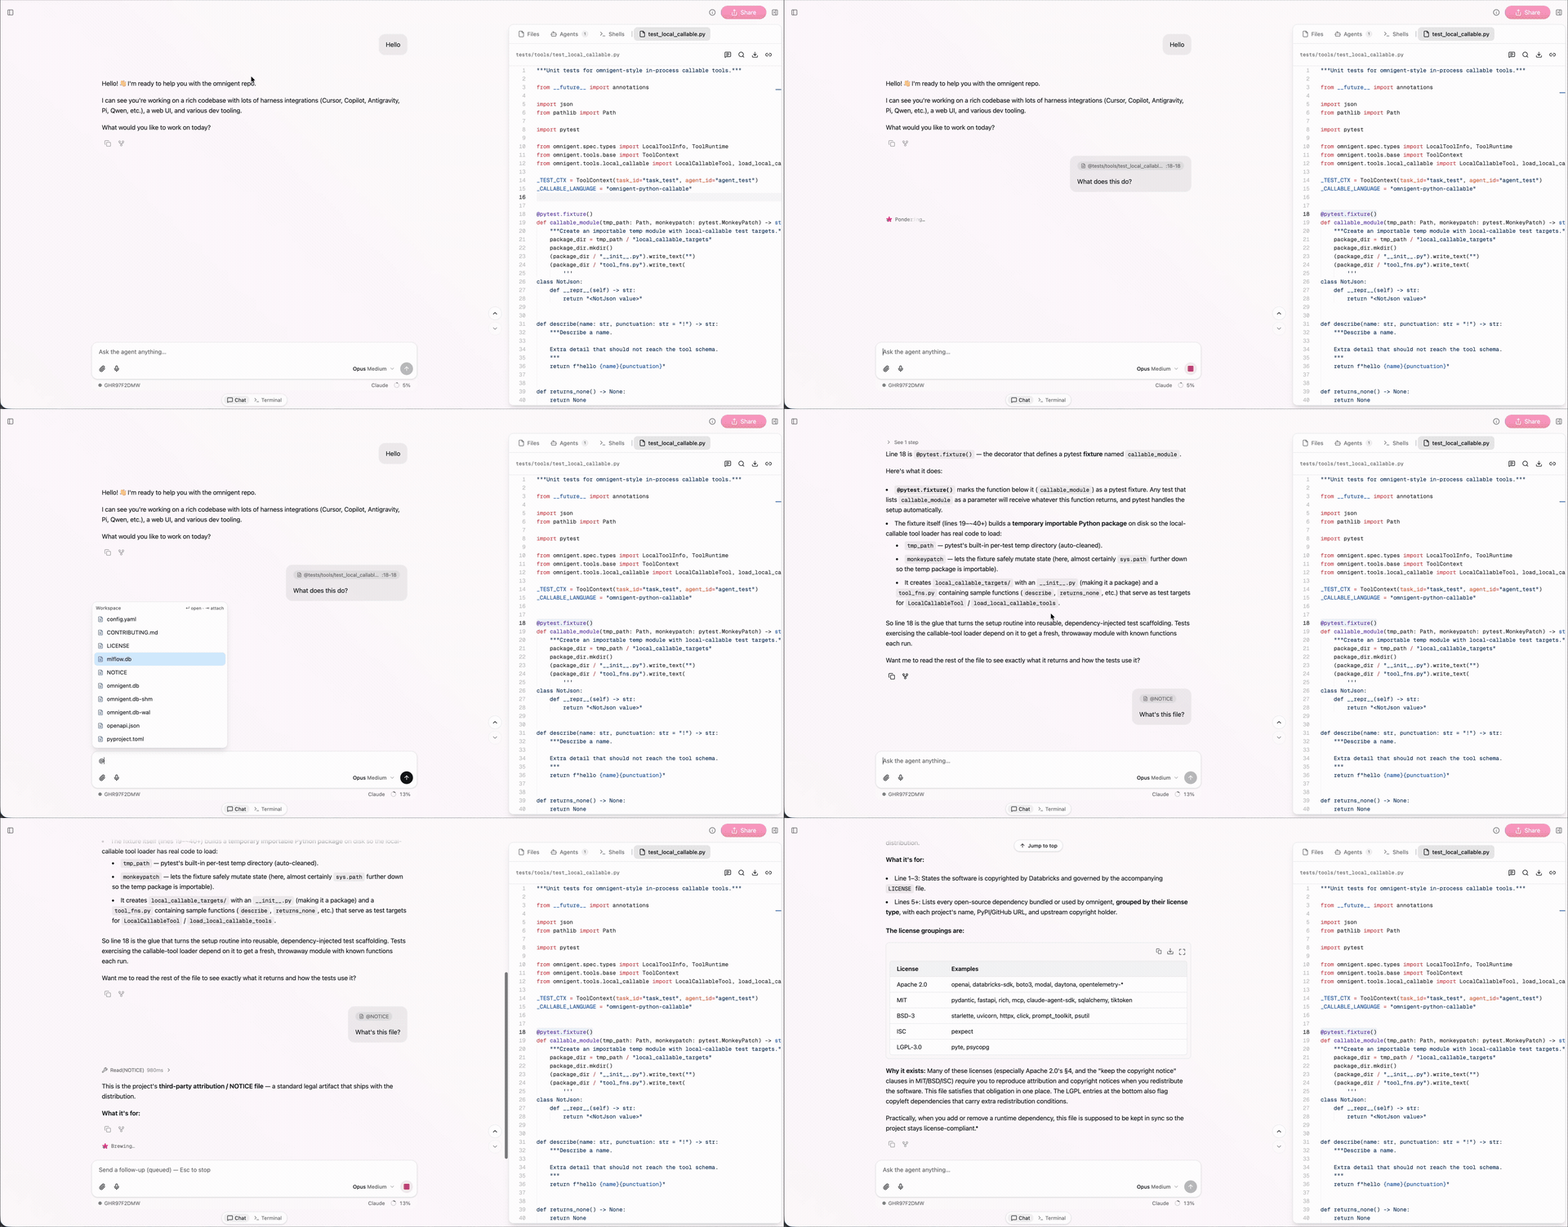
In a coding-agent session, select lines in the code viewer or a diff and an
Attach to agent button appears next to Add comment. Clicking it drops the
selected line span into the composer as a chip (shown as @path:start-end),
so you can ask the agent about an exact range without copy-pasting it into chat.
The chip is delivered to the agent at send time as a path reference — the agent
reads the on-disk file directly (no upload). This button shows only for native
coding-agent sessions, since those harnesses run in the workspace and resolve
the referenced file themselves.
Mentioning workspace files
In a coding-agent session, type @ in the composer to browse and attach
workspace files and folders. Attached paths appear as chips above the input and
can be removed individually; the agent reads each one directly from disk at send
time.
Appearance settings
Open Settings → Appearance to tune how code renders. Separate from the chrome
(UI) font, two controls size and style the code editor (Monaco) and the
terminal (xterm) together:
- Code font size — a stepper (
−/ value /+, or type a value directly). Ranges from 10 to 24 px and defaults to 13 px. - Code font family — a free-text field: type the name of any monospace font
installed on your device. Leave it blank (or use
Reset) for the editor default, which falls back to the app's shared mono stack. A custom name that isn't installed degrades to that mono stack rather than a serif fallback.
Both settings apply live to any open editor or terminal — no reload or reconnect — and persist in your browser across refreshes and restarts.
Inline comments and addressing
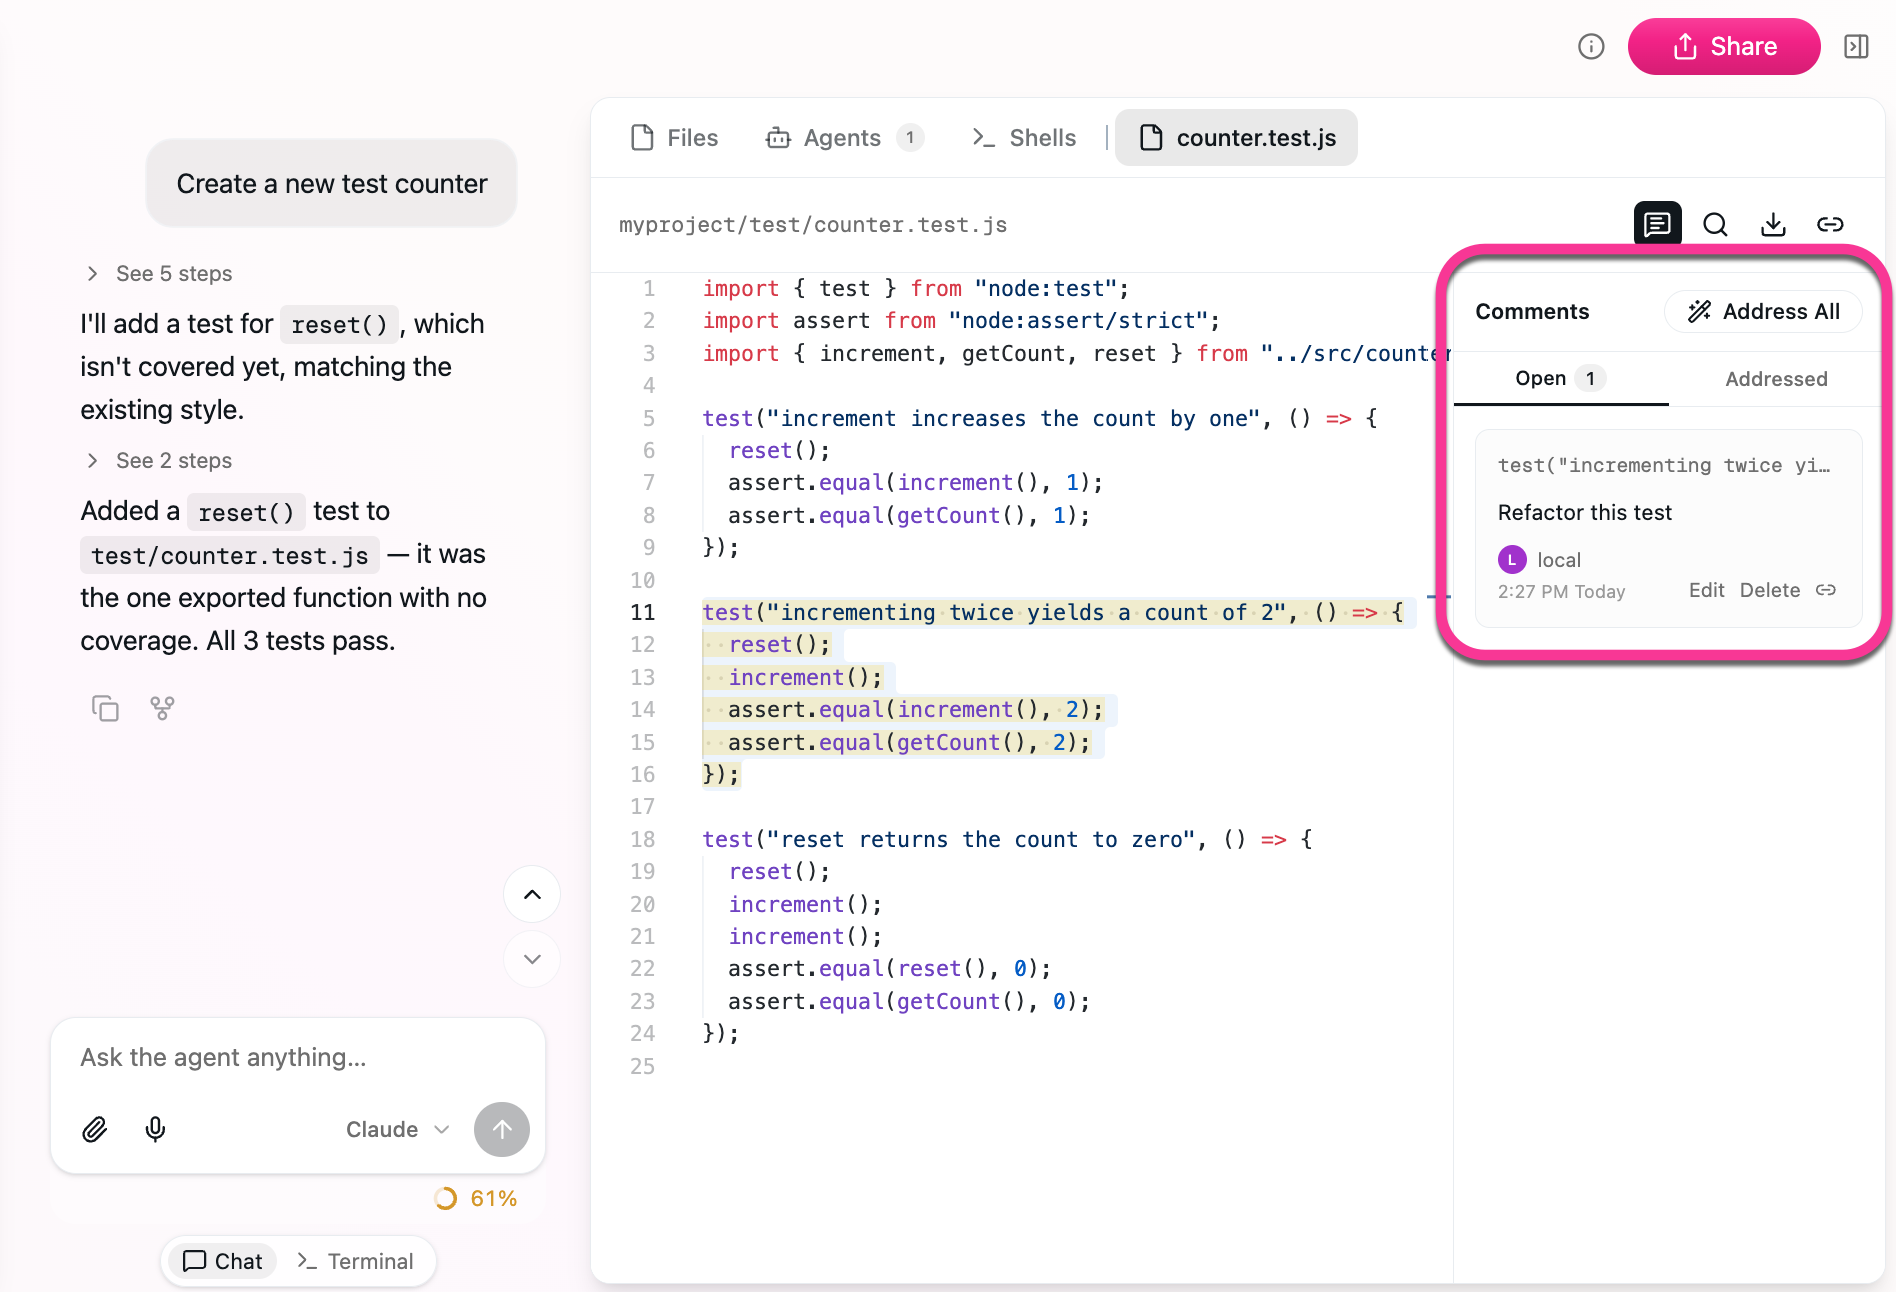
Instead of typing in chat "change the third paragraph to be more concise," you click on that paragraph and leave a comment: "too verbose, tighten this up." The Omnigent sees exactly what you're referring to and revises it.
Addressing closes the loop: resolve a comment and the Omnigent acts on the feedback. The workflow is: Omnigent proposes, you annotate, Omnigent revises.
Where this matters most:
- Reviewing plans before execution. Annotate the steps you want changed before the Omnigent starts building.
- Editing drafted docs. Leave line-level feedback instead of rewriting in chat.
- Iterating on configs. Flag the fields that need adjustment.
Multi-modal input
Paste images, screenshots, diagrams, and mockups directly into the conversation. The Omnigent sees them alongside your text. Useful for frontend work where describing a layout issue in words is slower than screenshotting it.
Message queue and steering
Type a follow-up while the agent is still working and it's held in a client-side queue instead of interrupting the turn. Queued messages appear in a docked strip above the composer, and drain automatically — one at a time, in order — as soon as the session goes idle.
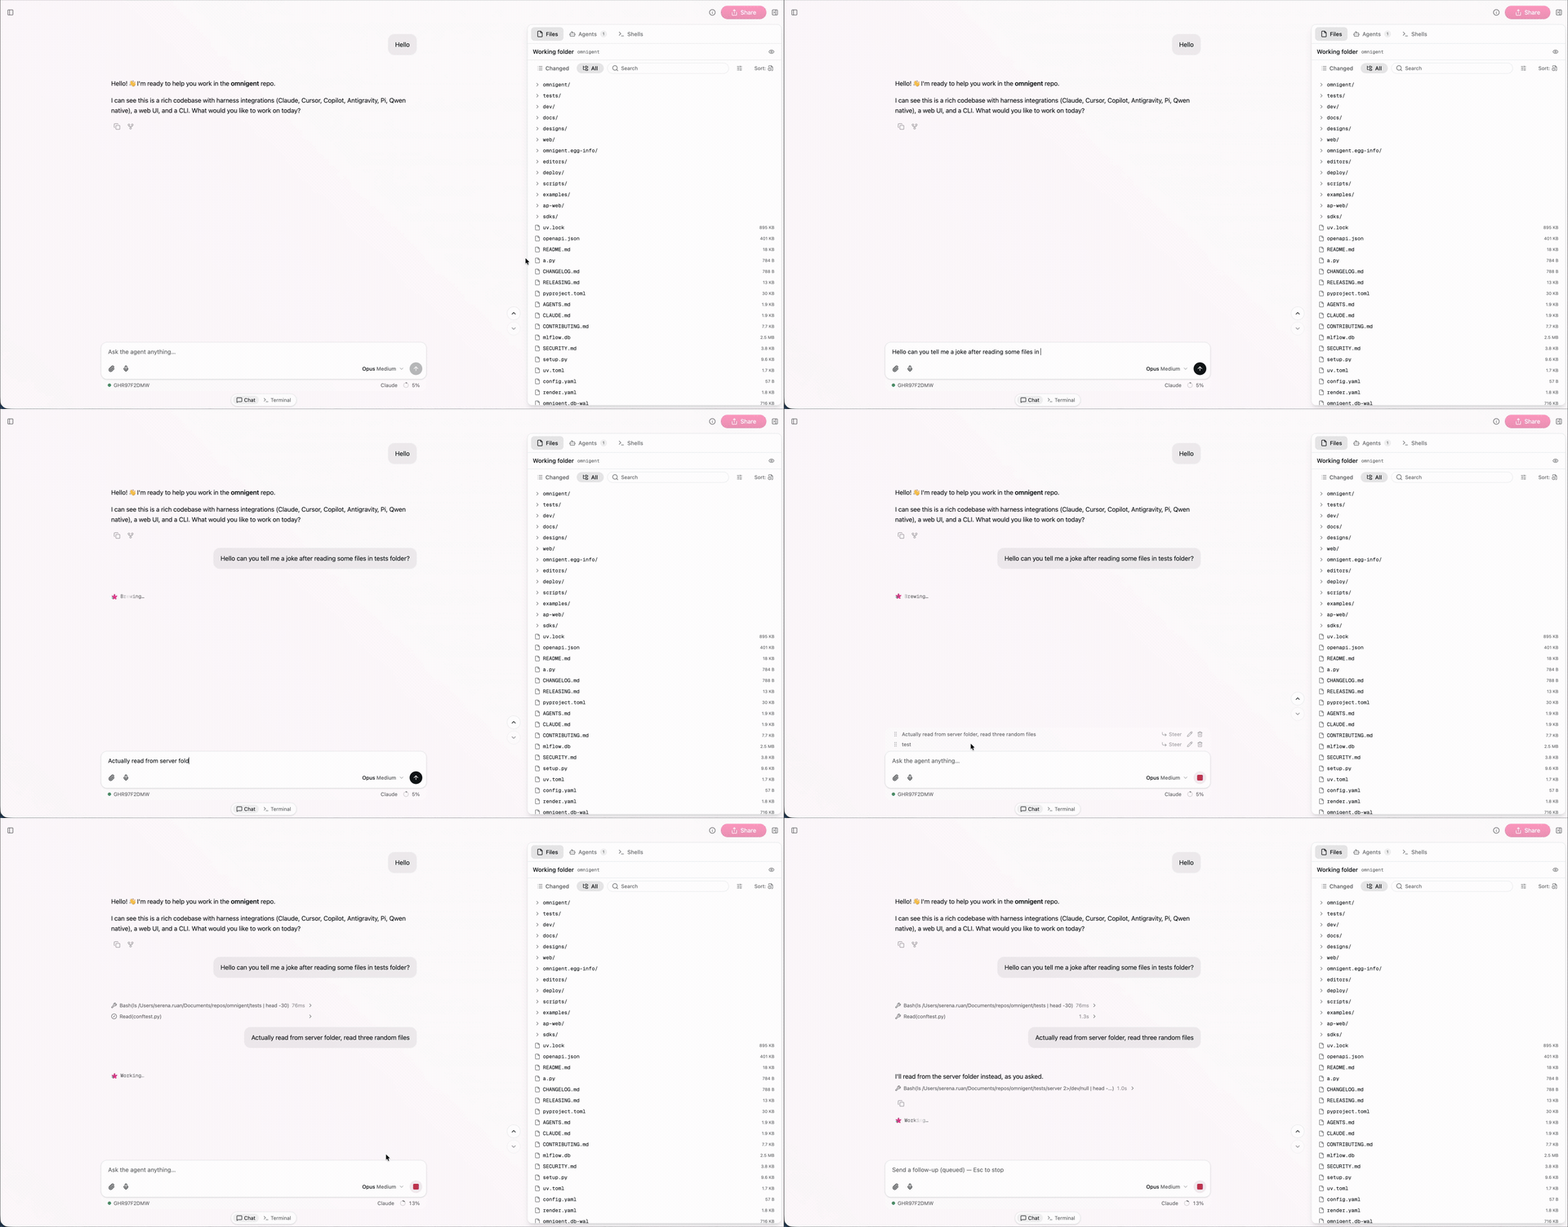
Each queued row has inline actions:
- Steer — send the message now, mid-turn, instead of waiting for the queue to flush.
- Edit — pull the message back into the composer to revise it.
- Delete — drop the message from the queue.
Collaboration
Share your session with teammates for real-time co-driving. Multiple people see the same conversation, leave comments, and interact with the Omnigent simultaneously.
See Pair Programming for details on sharing, permissions, and multi-user workflows.